Parts of a Texas Bluebonnet: A Complete Guide to Bluebonnet Anatomy
If you’ve ever tried to research the parts of a Texas Bluebonnet, you probably noticed the same thing I did: there’s almost nothing out there. For a flower this iconic, that’s surprising. So I went deep into the botany, pulled from university research and field guides, and put together the reference I wish I’d had when I started planning our bluebonnet unit study.
Whether you’re a homeschool parent building a nature unit, a student working on a school project, or just someone who wants to know what’s actually going on inside that little blue flower on the side of the highway, this is for you.
Scientific Name and Taxonomy
The Texas Bluebonnet’s scientific name is Lupinus texensis. It was first described by the English botanist William Jackson Hooker in 1836, based on plant material collected near San Felipe in Austin County, Texas.
Here’s where it falls in the classification system:
Kingdom: Plantae (plants)
Phylum: Tracheophyta (vascular plants)
Class: Magnoliopsida (flowering plants)
Order: Fabales
Family: Fabaceae (the legume family, same as peas, beans, and clover)
Subfamily: Faboideae
Genus: Lupinus
Species: L. texensis
That family connection is worth pausing on. Bluebonnets are legumes, just like the green beans in your garden. That means they share some key traits with peas and beans, including nitrogen-fixing root nodules and seed pods. More on both of those below.
A quick note: Texas actually recognizes six species of bluebonnet as its state flower, not just one. Lupinus texensis is the most common and the one you’ll see blanketing roadsides and fields across Central Texas every spring. Others include Lupinus havardii (the Big Bend Bluebonnet), Lupinus subcarnosus (the original state flower designation from 1901), and a few more. But when most people say “bluebonnet,” they mean Lupinus texensis, and that’s the species we’re focusing on here.
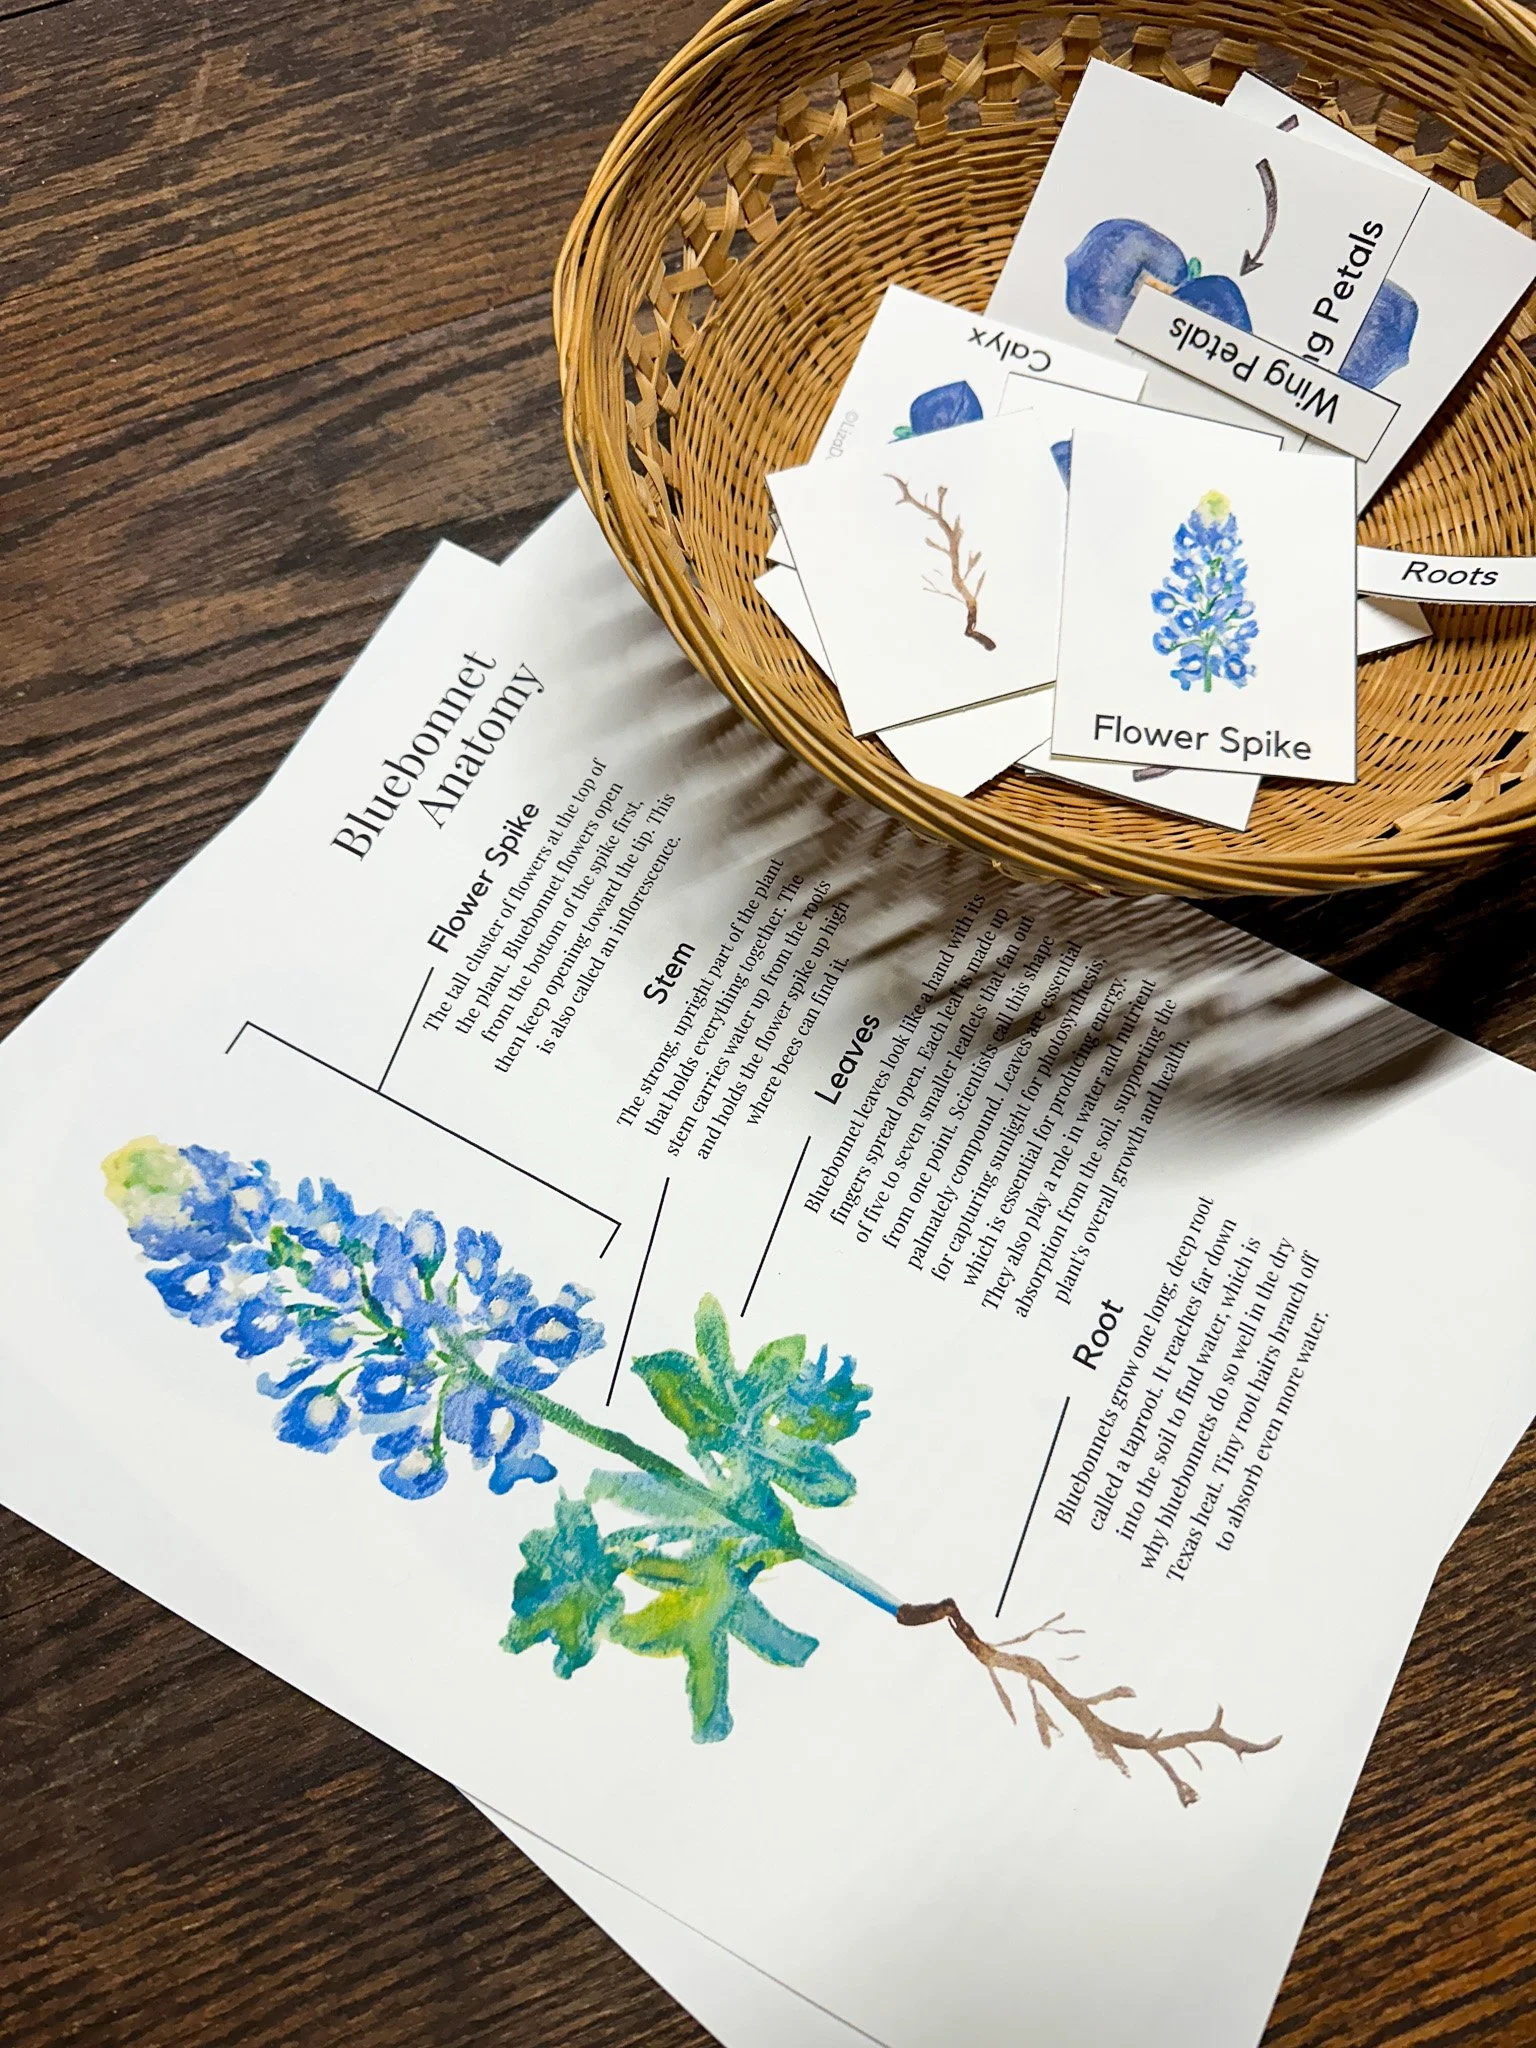
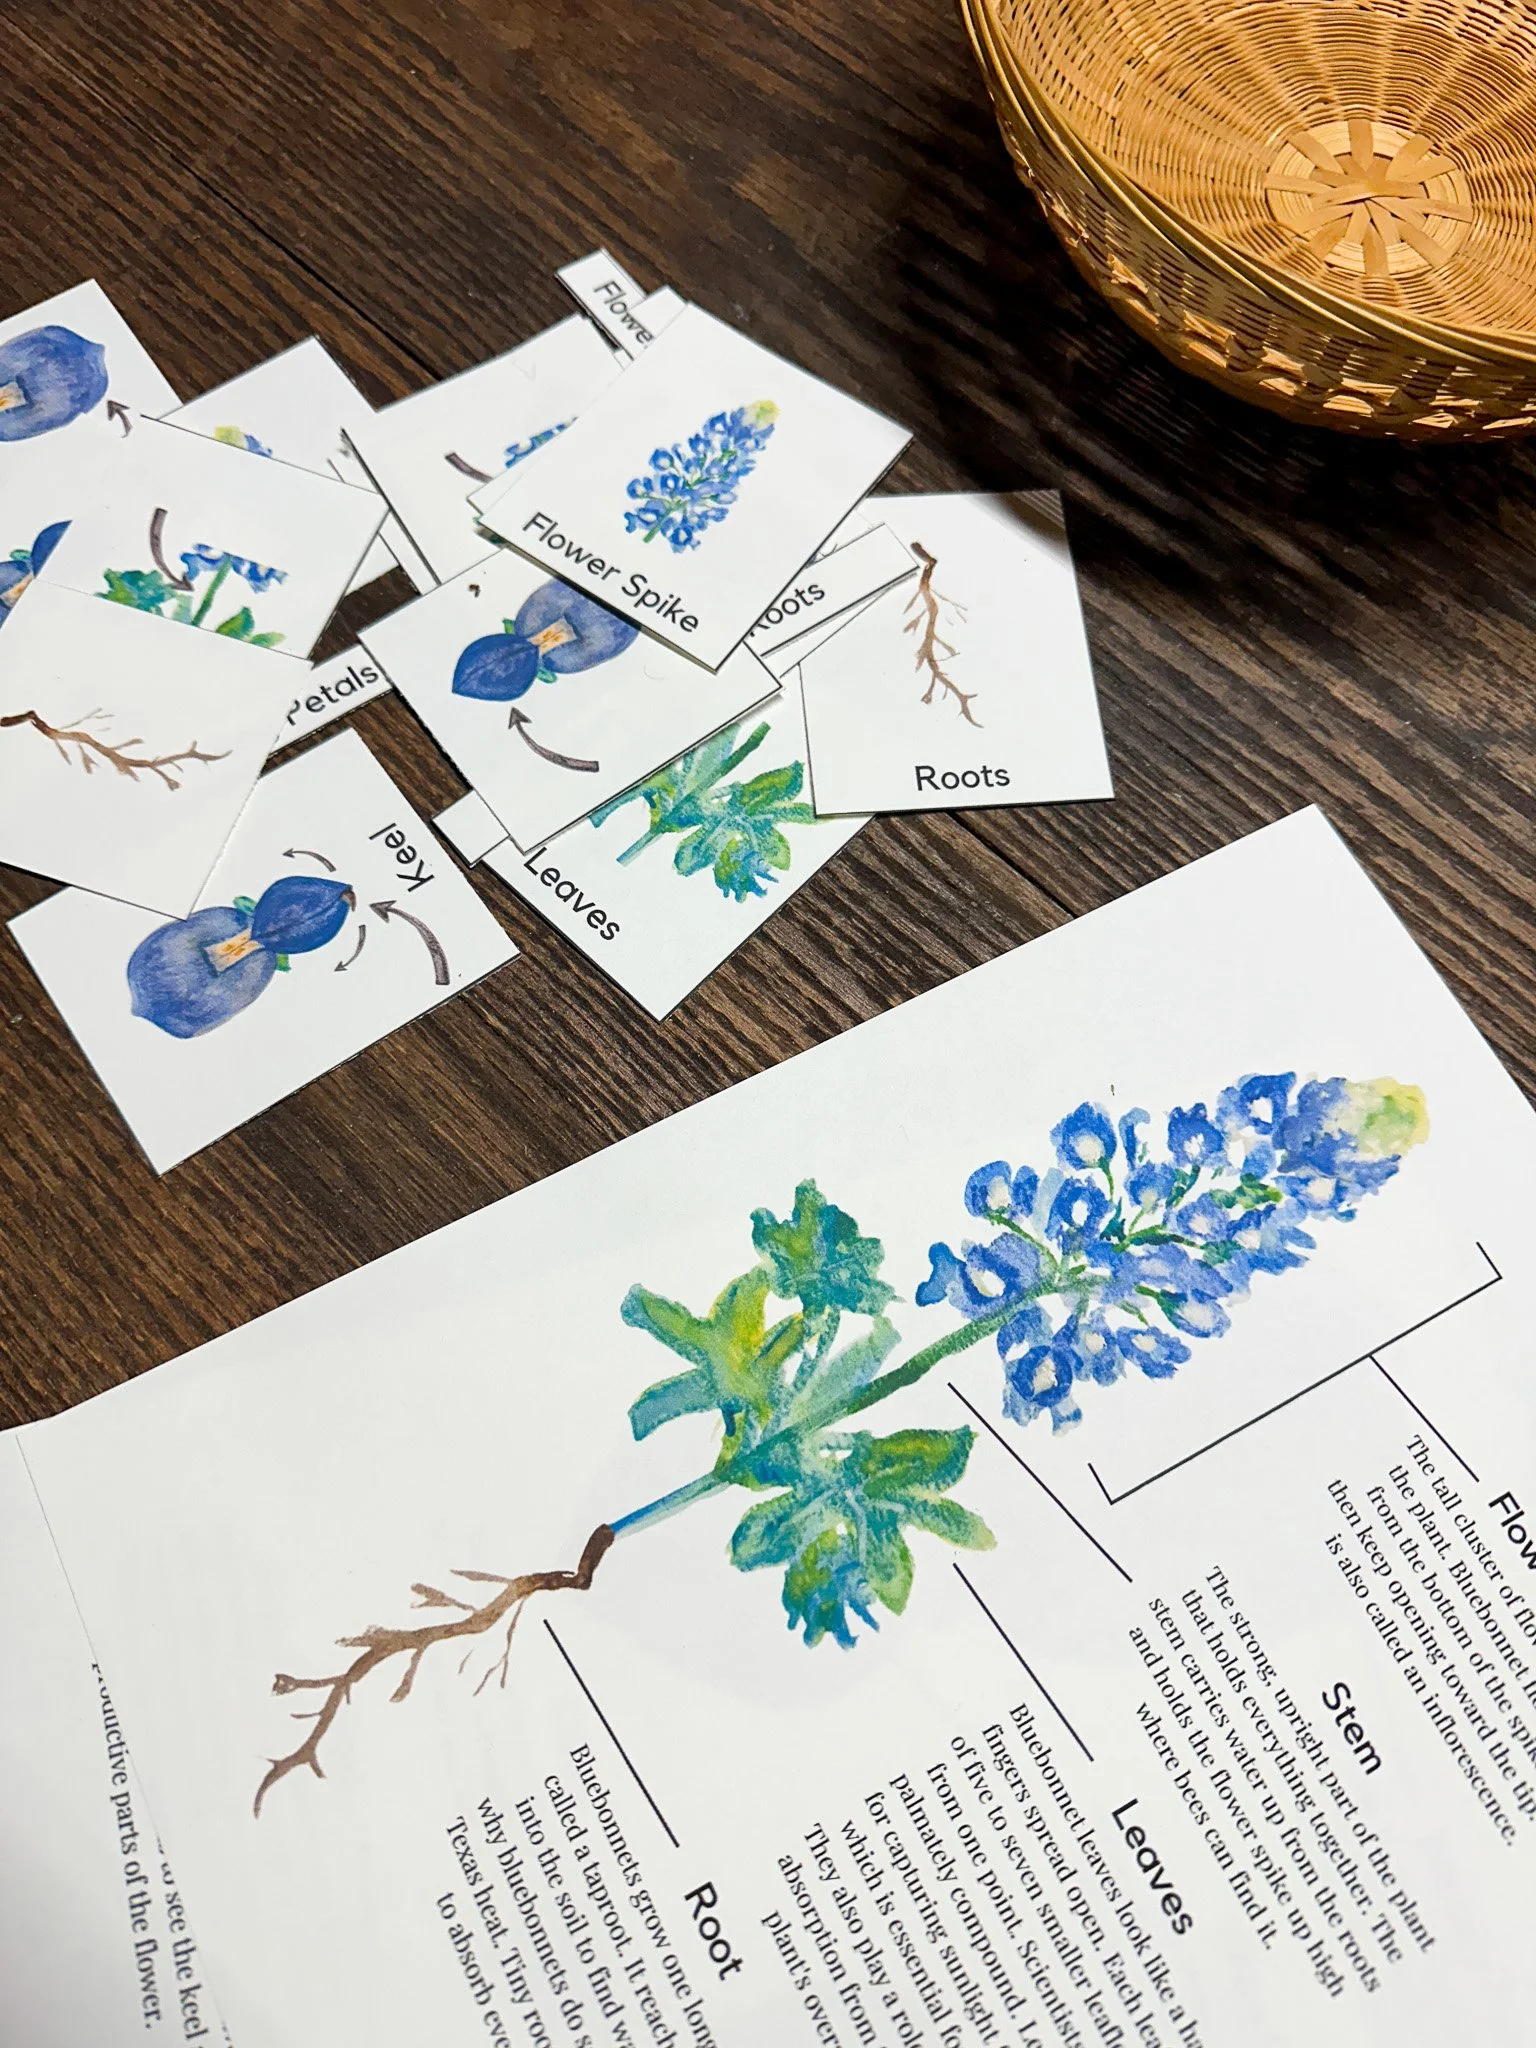
The Whole Plant: Parts of a Bluebonnet from Root to Flower
A bluebonnet is an annual herbaceous plant, meaning it completes its entire life cycle in one growing season. Plants typically reach 15 to 60 cm (about 6 to 24 inches) tall. Here are the major parts:
Roots
Bluebonnets grow from a taproot, a single main root that grows straight down. Along that taproot, you’ll find small rounded bumps called root nodules. These nodules house Rhizobia bacteria that have a symbiotic relationship with the plant. The bacteria convert nitrogen from the air into a form the plant can use, and in return, the plant provides the bacteria with sugars and a place to live.
This nitrogen-fixing ability is one reason bluebonnets thrive in poor, rocky, disturbed soils where other wildflowers struggle. It’s also why they’re so common along Texas roadsides and in limestone-heavy areas like the Edwards Plateau.
Stem
The stem is upright, branching, and covered in fine, soft hairs that give the whole plant a slightly velvety texture. Stems are typically light green and can branch into multiple flower-bearing stalks from a single base.
Leaves
Bluebonnet leaves are palmately compound, meaning the leaflets radiate out from a central point like fingers on a hand. Each leaf usually has five leaflets (sometimes seven), each one shaped like a narrow oval (oblanceolate, if you want the botanical term). The leaflets are 3 to 10 cm long, light green, and edged with fine, soft hairs that catch the light and give the leaves a faint silvery outline.
The leaves grow alternately along the stem, and you’ll notice they tend to fold up slightly along the midrib, especially in hot sun or at night.
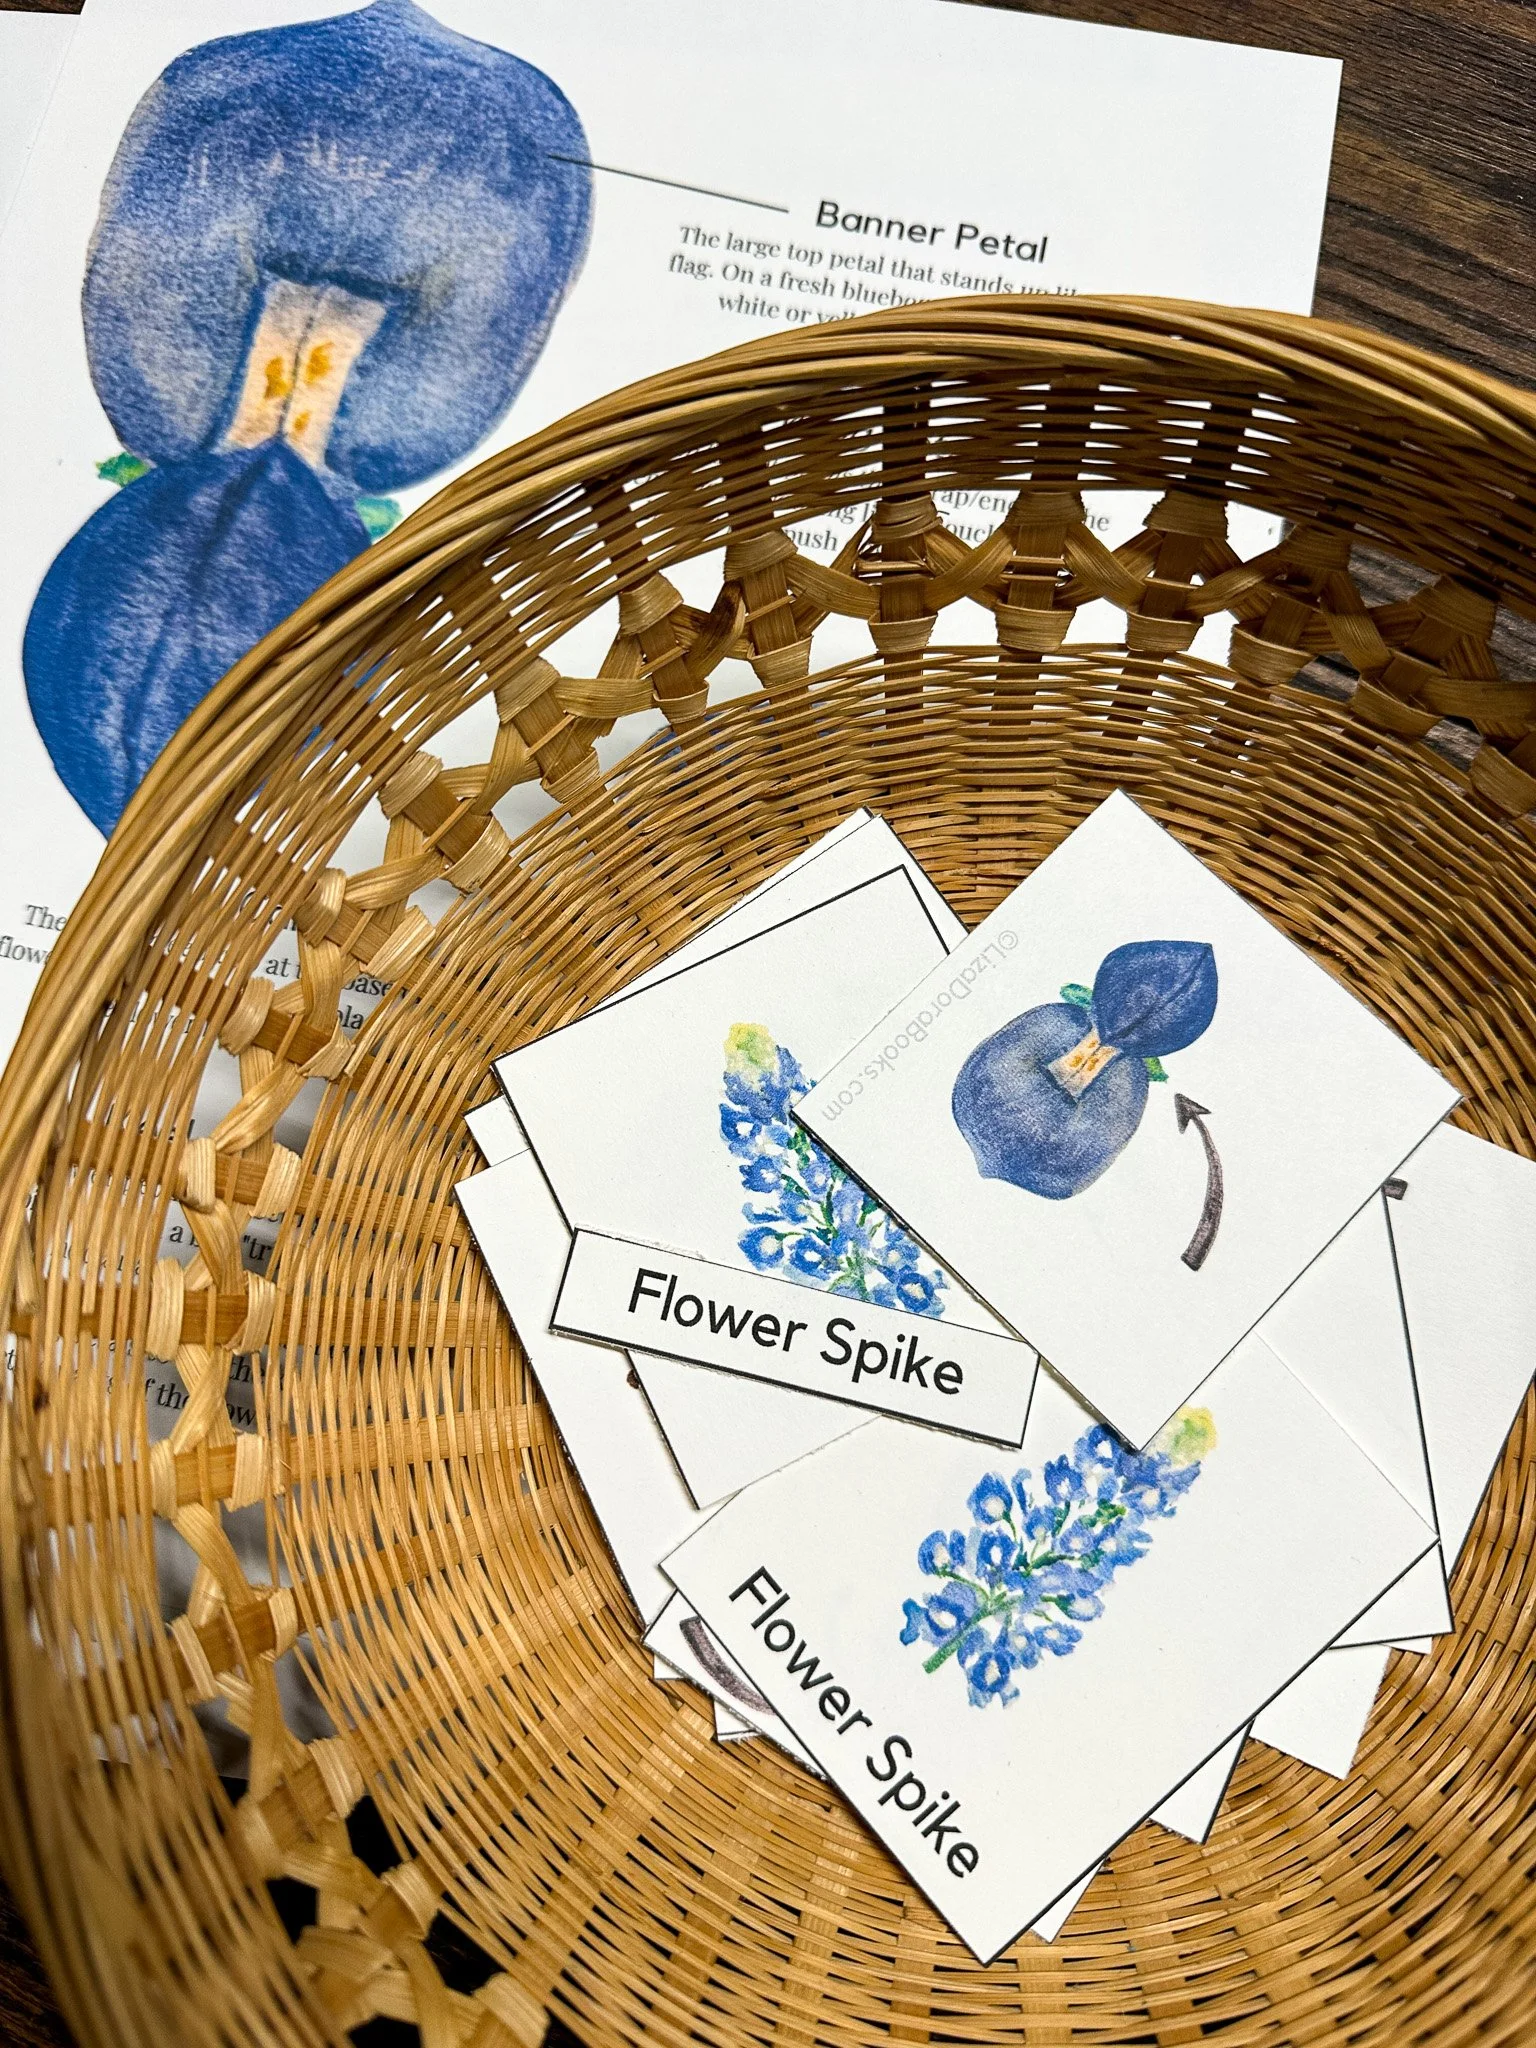
Flower Spike (Raceme)
The flowers don’t grow individually. They’re arranged along a tall central stalk called a raceme (pronounced “ray-seem”). Each raceme can hold 20 to 50 individual florets, stacked alternately up the spike, with the oldest flowers at the bottom and the newest buds at the top. A mature raceme can reach up to 25 cm (about 10 inches) long.
This is what gives bluebonnets their distinctive shape, that tall, dense cone of blue that makes the fields look like they’ve been painted.
Seed Pods
After pollination, each fertilized floret develops a small, fuzzy seed pod (technically called a legume, just like a pea pod). The pods are 2.5 to 4.2 cm long and contain 3 to 6 seeds each. As they mature in the Texas heat, the pods dry out and eventually split open with a twisting motion, flinging the seeds a short distance from the parent plant.
This is one of the coolest things to watch with kids if you can find mature plants in late spring. The seed dispersal is fast and audible if you’re close enough.
Close-Up: Anatomy of a Single Bluebonnet Floret
This is where it gets really interesting, and where most resources fall short. Each individual floret on the raceme is a miniature engineering marvel. Like all members of the Fabaceae family, the bluebonnet flower has a papilionaceous structure, meaning it looks like a tiny butterfly. Each floret has five petals in three distinct groups:
Banner Petal
The large, upright petal at the top of the floret. This is the most visible part and the one doing most of the work when it comes to attracting pollinators. In the center of the banner petal, you’ll see the banner spot, a marking that starts out bright white (or sometimes pale yellow) in young flowers.
The banner spot is the key to one of the bluebonnet’s most fascinating tricks, and we’ll get to that in the pollination section below.
Wing Petals
Two petals on either side of the flower, flanking the keel. These function like a landing pad for visiting bees. When a bee’s weight presses down on the wing petals, it triggers the keel to open, exposing the reproductive parts inside. It’s a mechanical system, elegant and precise.
Keel
The two bottom petals are fused together into a boat-shaped structure called the keel. This is the protective housing for the flower’s reproductive organs: the stamens (male, producing pollen) and the pistil (female, receiving pollen and producing seeds).
The stamens and pistil are deliberately separated inside the keel. This prevents self-fertilization. Bluebonnets cannot pollinate themselves; they need an insect visitor to make reproduction happen.
Calyx
Beneath the petals sits the calyx, a small cup of fused sepals that holds the base of the floret together. It’s two-lipped and three-lobed, measuring about 4 to 5 mm long. It’s easy to overlook, but it’s the structural foundation of each flower.
The Color-Changing Mystery: How Bluebonnets Talk to Bees
This is one of the parts that makes teaching bluebonnets fun, and it’s the detail that most people have never heard.
When a floret first opens, its banner spot is bright white. To a bee, which sees in ultraviolet, that white spot practically glows. It’s a signal that says: “Come here. There’s fresh pollen and nectar waiting.”
After about five days, something changes. The banner spot begins shifting from white to pink, then to a deep reddish-purple by day six. At the same time, the pollen becomes less abundant, less sticky, and less fertile.
Here’s what makes this even more interesting: research published in The Southwestern Naturalist found that this color change happens on a timer, not in response to pollination. Bluebonnets grown in the absence of bees still change color on the same schedule. The plant is essentially running an internal clock.
The result is a built-in guidance system. Bees visit the white-spotted florets (fresh, fertile, full of pollen) and ignore the purple-spotted ones (older, spent). Studies have shown that bees collect up to 150 times more pollen from white-spotted florets than from purple-spotted ones, with approximately 96% of pollinator visits directed at the white flowers.
This system benefits both sides. Bees get maximum nutrition with minimum wasted effort, and the plant ensures its best pollen reaches other flowers. It’s a textbook example of plant-pollinator mutualism, and it’s happening in every bluebonnet field in Texas right now.
How Pollination Works (Step by Step)
Here’s what happens when a bumblebee visits a bluebonnet floret:
The bee spots the white banner spot on a young floret and lands on the wing petals.
The bee’s weight pushes the wing petals down.
This triggers the keel to snap upward, pressing the pistil against the bee’s underside.
At the same time, the pollen-covered stamens brush against the bee’s body, dusting it with pollen.
The bee collects pollen into special hairy baskets on its hind legs.
When the bee visits the next flower, pollen from the first plant transfers to the new flower’s pistil, completing cross-pollination.
Some experienced bees learn to avoid the snap mechanism entirely by approaching the nectaries from the side of the flower. They still transfer pollen in the process, but they skip the full keel trigger. Clever.
If a floret doesn’t get pollinated, it won’t produce seeds. Every bluebonnet seed you see exists because a bee made a visit.
Fun Facts for Your Unit Study
Here are a few more details that are great for rounding out a nature study or research project:
Bloom season: March through May. Peak viewing in Central Texas is usually mid-April, but it varies year to year based on fall rainfall.
Habitat: Prairies, open fields, and roadsides. Concentrated in the Blackland Prairie and Edwards Plateau regions of Texas, but also found in Louisiana, Arkansas, and parts of northern Mexico.
Soil preference: Poor, well-drained, alkaline soils. They love limestone. That nitrogen-fixing root system means they actually improve the soil for plants that come after them.
Ecological role: Larval host plant for hairstreak and elfin butterflies. Major nectar source for bumblebees and honeybees.
Height range: 6 to 24 inches, depending on growing conditions.
Fragrance: Sweetly fragrant, especially in the morning. Worth a close sniff if you’re out in the field.
Legal note: It is NOT illegal to pick bluebonnets in Texas. That’s a myth. However, it is illegal to trespass on private property to pick them, and it is illegal to dig them up from state highway right-of-way. So look, don’t dig, and stay on public land. (Also, I think everyone who grew up when I did just KNEW the police would come after you and were terrified. :) )
Studying Bluebonnets with Kids
If you’re using this as a reference for a unit study, here are a few hands-on ideas:
Dissect a floret. Carefully pull apart a single bluebonnet flower and identify each part: banner, wings, keel, calyx, stamens, pistil. Tape or glue each piece to paper and label it. This works beautifully with kids ages 5 and up.
Observe the color change. Find a raceme with florets in different stages. Can your child spot which ones are “calling” the bees (white spots) and which ones are “done” (purple spots)? Count how many of each you see on a single spike.
Root nodule hunt. If you have access to a whole plant (end of season, after seeds have dropped), gently wash the roots and look for the small bumps where nitrogen-fixing bacteria live.
Compare to a pea or bean flower. Bring a snap pea blossom and a bluebonnet side by side. Can your child find the same five-petal structure (banner, wings, keel) in both? This is the Fabaceae family in action.
Use 3-part nomenclature cards. Montessori-style 3-part cards are one of the best tools for learning plant anatomy because they let kids match vocabulary to images at their own pace, building from picture recognition to reading to independent labeling. We created a set specifically for bluebonnet anatomy that covers eight parts at two levels: the whole plant (leaves, roots, stem, flower spike) and a close-up flower dissection (banner petal, wing petals, keel, calyx). You can find them in our Bluebonnet Anatomy 3-Part Cards.
Take It Further
If your learner loved this, our Bluebonnet Anatomy Mini Unit goes deeper with fill-in-the-blank worksheets, a reading page on the color-changing mystery (perfect for the science-obsessed kid), a watercolor painting project with a template, and a hand-painted art print. It pairs well with our Texas Wildflower 3-Part Cards if you’re building a broader wildflower unit.
All of our printables feature original hand-painted watercolor illustrations, not clip art. Every page is designed to be as beautiful as it is educational.
Dig into the Texas state flower from root to flower spike! This mini unit features original hand-painted watercolor illustrations and is packed with 4 beautifully illustrated core activities + 3 FREE bonus activities that turn bluebonnet anatomy into a hands-on science, art, and literacy adventure for ages 3–10.
🌿 Plant Anatomy
Labeled Bluebonnet Anatomy Page (whole plant)
Close-Up Flower Anatomy Page (banner petal, wing petals, keel, calyx)
Fill-in-the-Blank Worksheet (whole plant)
Fill-in-the-Blank Worksheet (flower close-up)
🔬 Montessori 3-Part Cards
8 Nomenclature Cards: Leaves, Roots, Stem, Flower Spike, Banner Petal, Wing Petals, Keel, and Calyx
Two learning levels: start with whole-plant parts for little ones, then introduce the close-up flower dissection when they're ready
🎁 3 FREE Bonus Activities:
Color Changing Mystery: Why do bluebonnets change from white to purple? A reading and science page about pollination and how bees use color as a signal.
Watercolor Painting Project: Step-by-step template so your child can paint their own bluebonnet. Includes a reference guide and painting page.
Bb Handwriting Practice: Uppercase and lowercase letter formation for the letter B.
What makes this mini unit special:
🎨 Original watercolor artwork throughout: hand-painted illustrations on every page. No clip art anywhere.
🔬 Two levels of anatomy: whole-plant parts for younger learners, close-up flower dissection (banner, wing, keel, calyx) for older kids
🫘 Real botany connections: learn why the bluebonnet belongs to the legume family, right alongside peas, beans, and clover
🐝 The Color Changing Mystery: the most fascinating page in the set. Your child will learn how bluebonnets signal bees by changing color after pollination.
🖌️ Watercolor painting project: a creative hands-on activity that brings the science to life
🌸 8.5x11" Art Print included: frame-worthy watercolor bluebonnet illustration
The 4 Core Activities + 3 Bonus:
Labeled Bluebonnet Anatomy Page (whole plant)
Close-Up Flower Anatomy Page (flower dissection)
Fill-in-the-Blank Worksheet (whole plant)
Fill-in-the-Blank Worksheet (flower close-up)
Montessori 3-Part Nomenclature Cards (8 parts, 2 pages)
8.5x11" Bluebonnet Art Print
BONUS: Color Changing Mystery (reading + science)
BONUS: Watercolor Painting Project (2 pages)
BONUS: Bb Handwriting Practice
Perfect for: Montessori homeschool families, nature study co-ops, preschool and elementary science centers, and anyone exploring Texas wildflowers with their kids. Take the 3-part cards outside during bluebonnet season and match each part to a real flower!
How It Works:
Purchase and download instantly
Print the activities you need (color printing recommended)
Grab some scissors, watercolors, and curiosity, and start exploring the state flower!
No shipping wait. No subscription. Just download, print, and dig into botany!
Pairs With:
Texas Wildflower 3-Part Cards ($5) for learning 8 Texas wildflower species by common and scientific name. Texas Wildflower Art Study ($5) for connecting wildflowers to famous artists like Georgia O'Keeffe and Claude Monet. Texas Wildflower Clothespin Cards ($3) for fine motor practice with wildflower matching.
Digital Download. No product will be shipped.
Download is in high quality .pdf format ready to print. Color print recommended.
No refunds. If you have trouble with your order, please contact us at info@lizadorabooks.com.
Featuring original artwork by Liza Dora. For personal and single-classroom use only. For institutional or multi-classroom licensing, contact schools@lizadorabooks.com. © Liza Dora Books
Liza Dora is a former chemistry teacher, children’s book author and illustrator, and the creator of Liza Dora Books, a collection of Montessori-inspired printable learning materials featuring original watercolor artwork. She lives in Texas with her husband and two kiddos, where bluebonnet season is a non-negotiable field trip every single year.